The Anterior Implant Blueprint: Mastering the EBC Emergence Profile Framework
How adding or removing temporary material shapes the gingival margin, the danger of too many appointments, and step-by-step chairside subgingival physics.
The Science of What Lies Hidden Beneath the Gums
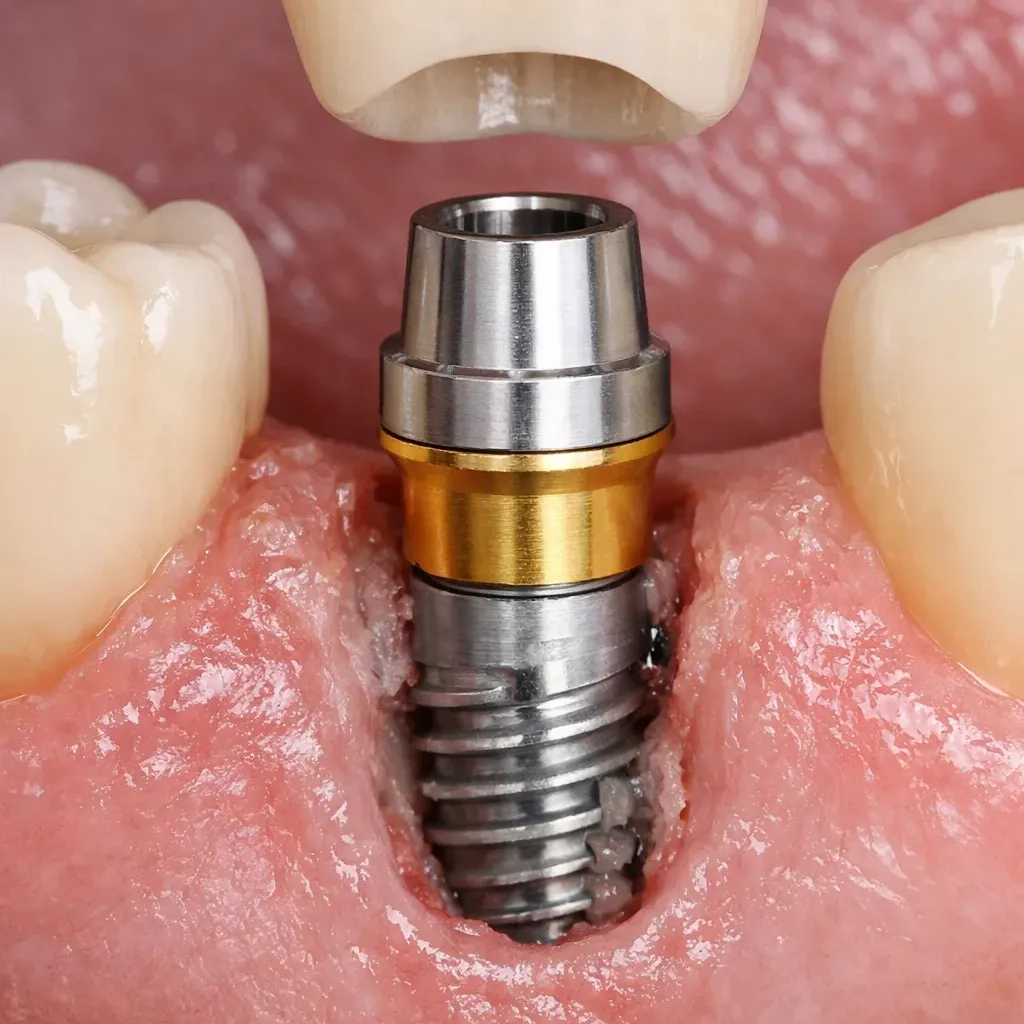
When we look at a beautiful front-tooth implant, our eyes naturally focus on the part we can see above the gums. But the real secret to keeping that smile stable and healthy happens completely out of sight. Managing the subgingival emergence profile is where the true clinical success is decided.
An implant abutment looks completely different than a natural tooth root. Under the tissue, it must follow a specialized curved shape to support the live pink margins safely. If you make the temporary crown too fat or over-contoured in the wrong spot, the body will push back, causing immediate tissue recession and bone loss.
By organizing your chairside temporary into three clear zones—the E-zone, B-zone, and C-zone—you remove the guesswork entirely. Understanding exactly when to add composite to push the gums, or when to grind it away to let the tissue grow, gives you complete control over your final aesthetic results.
Protecting the Mucosal Seal and Engineering the Three Tissue Zones
In this continuation of our implant aesthetics series, premier prosthodontist Dr. Jonathan Esquivel joins host Dr. Melissa Seibert to share the biological and chairside steps required to build stable front restorations.
The Appointment Rule: Stop Disturbing the Tissue Seal
One of the most critical rules in front implant care is to design your treatment using the fewest appointments possible. Dr. Esquivel clarifies that this does not mean rushing the overall treatment time. Instead, it means keeping your hands out of the site as much as you can.
Every single time you unscrew a temporary crown or a healing abutment, you physically tear a fragile biological structure called the weak mucosal seal. This cell attachment takes a massive amount of time to heal. Constantly breaking this connection causes deep bone remodeling. By utilizing modern digital CAD software, you can plan your shifts in advance and print or mill highly accurate temporaries to minimize tissue disturbance.
Chairside Mechanics: Crafting the Temporary Pickup
When creating an immediate temporary crown right after surgery, the process requires combining basic steps smoothly. Start with a pre-milled plastic shell that has two temporary wings resting on the adjacent teeth to lock it into a perfect position. Place a metal temporary cylinder chimney into the implant, paint it with an opaque resin so the metal does not shine through, and seat your hollow shell right over it.
Once everything is lined up, inject a flowable composite into the access hole to lock the plastic shell to the metal cylinder. Unscrew the whole piece from the mouth. Now, you have a physical replica of the tooth attached to a raw metal cylinder shank, with an empty gap inside the surgical socket area. This is where you manually build your subgingival shape chairside.
Breaking Down the EBC Emergence Concept
To design the subgingival area without compressing the live tissues, Dr. Esquivel uses the simple EBC organization system, which builds directly upon traditional critical and subcritical contour theories:
- The E-Zone (Aesthetic / Critical Contour): This is the first single millimeter hidden just beneath the visible gum line. Whatever you do here changes where the gum line sits. Adding a tiny bit of composite pushes the tissue down apically. Shaving material away with a bur makes it sub-contoured, allowing the soft tissue to naturally creep forward.
- The B-Zone (Bounding / Biological Boundary): This is the middle space running roughly 1.5 millimeters deep. This is where your live mucosal attachment actually fastens to the restoration. You must shape this zone to be highly concave using a pear-shaped or football acrylic bur. Keeping it scooped out creates vital space for a thick volume of tissue.
- The C-Zone (Crestal Zone): This is the deepest, most apical section right above the implant platform, measuring 1.5 to 2 millimeters in height. This area must be kept perfectly slim, straight, and parallel. If you make the C-zone too fat, it will crush the bone surrounding the implant laterally, triggering rapid bone loss.
Clinical Takeaways
- Limit Disconnections: Focus your workflow on the lowest number of appointments possible to prevent tearing the weak mucosal tissue seal repeatedly.
- Control Gums in the E-Zone: Add flowable composite to the first subgingival millimeter to push tissue apically, or subtract material to let the margin creep forward.
- Carve a Concave B-Zone: Use a pear-shaped acrylic bur to make the middle section concave, giving the junctional epithelium room to live.
- Keep the C-Zone Ultra-Slim: Keep the deepest 2mm of the temporary straight and thin to prevent bone remodeling around the implant neck.
- Steam and Cure Thoroughly: Put your hand-lined temporaries in a pressure pot or cure them intensely to clear out raw monomers and free radicals before steaming them clean.
Chapters & Timestamps
| Timestamp | Topic Covered in Episode |
|---|---|
| [00:00] | Introduction and Downloading the Step-by-Step Anterior Injection Molding Guide |
| [05:15] | Immediate vs. Healed Ridge Scenarios: Reading Phenotype Widths |
| [13:40] | The Appointment Threshold: Preventing Biological Trauma to the Mucosal Seal |
| [24:10] | The 6-Step Protocol: Managing the Team Communication Loop |
| [35:20] | Chairside Mechanics: Executing a Flawless Shell-and-Cylinder Pickup |
| [46:15] | The EBC Emergence Concept: Subgingival Architecture Rules |
| [55:40] | Bur Geometry: Shaping Concavities and Protecting the Bone Crest |
Dr. Jonathan Esquivel
Prosthodontist & Implant Aesthetics Specialist
A nationally recognized prosthodontist, private practitioner, and dedicated educator specializing in implant aesthetics and biologically driven restorative dentistry. Dr. Esquivel completed his advanced specialty training and aesthetic implant fellowship at the LSU School of Dentistry. He has received numerous prestigious awards for educational excellence, including the Claude Baker Award from the American Academy of Fixed Prosthodontics. His global lectures and published research focus on tissue stability and custom emergence profile design.
Aesthetic Restoration Systems
Dr. Melissa Seibert
DMD, MS, FAGD, ABGD
Creator and host of the Dental Digest Podcast — the #1 clinical dental podcast worldwide and a top 1% global podcast. Dr. Seibert is a former active-duty U.S. Air Force dentist, internationally sought-after speaker, Key Opinion Leader, and published author in top dental journals. She is passionate about equipping general dentists with high-level, evidence-based clinical skills.
Publications & SpeakingMaster This Workflow in Your Practice
The Dental Digest Podcast brings you the theory — but Elevated GP gives you the over-the-shoulder execution. Step-by-step video masterclasses, clinical mentorship, and CE credit to implement these techniques seamlessly. Join our global community of dentists.
Explore the Elevated GP MembershipStudies & Resources
- Free Clinical Guide — Step-by-Step Anterior Injection Molding Technique
- Free Access Implant Course — Leave a podcast review, email a screenshot to Dr. Seibert, and unlock free emergence profile video modules
- The EBC Framework Study — Dr. Jonathan Esquivel's Published Guidelines on Subgingival Tissue Configurations
Full Episode Transcript
Dr. Melissa Seibert: Hey, I want to tell you about something I put together for you. I created a free PDF guide that walks you step-by-step through the injection molding technique. I love this technique because it is one of the best ways to get predictable, beautiful, and highly aesthetic anterior composites. You're actually injecting the composite directly into the tooth using a clear template which makes it far more consistent and efficient. If you like this guide, I've made it super easy. Just head over to theelevatedgp.com forward slash IMPDF. And to make it even simpler, I've included the link for you right here in the show notes.
Hey, welcome to Dental Digest. This is a podcast with a mission of enabling you to stay on the cutting edge of evidence-based dentistry. And I'm your host, Dr. Melissa Seibert. This is part two of my series with Dr. Jonathan Esquivel. Today, we'll continue our deep dive into biologically driven implant aesthetics, focusing on provisionalization, emergence profile design, and interdisciplinary planning. Dr. Esquivel shows us how blending biology and aesthetics leads to symmetry, stability, and results that patients truly value.
Dr. Esquivel is a prosthodontist in private practice who completed his specialty training at LSU's School of Dentistry in 2013, followed by an aesthetic implant fellowship in 2014. A former LSU faculty member, he's been recognized with multiple teaching honors, including the Golden Apple Award, the Dr. Alan A. Copping Award for Excellence in Teaching, and the 2023 Claude Baker Award from the American Academy of Fixed Prosthodontics. Widely published and an invited national and international speaker, Dr. Esquivel is passionate about advancing prosthodontics while delivering individualized, aesthetically driven care at the highest level.
I've got something that you're going to love. If you've been loving the podcast and want to dive deeper into mastering implant dentistry, this is your chance. I'm giving away access to one of my on-demand courses completely free. This course is packed with everything you need to know about implant occlusion, platform switching, and creating that stunning aesthetic emergence profile that sets your work apart. Here's how to grab it. Leave a rating for the podcast, take a quick screenshot, and send it my way. You can either direct message me on Instagram, my Instagram handle is dr.melissaseibert, or send it to me in an email at dr.melissaseibert at gmail.com. Once you get the screenshot, I will send you access to the course so you can start learning right away. It's my way of saying thank you for supporting the podcast and being part of this amazing community, and I can't wait to hear what you think.
Okay, so walk me through this. What is your workflow for provisionalizing an anterior implant?
Dr. Jonathan Esquivel: So it's going to depend on where I'm starting from. If I'm starting with an immediate implant situation, well, I kind of described it already basically is I want to maintain the existing aesthetics, stability of the free gingival margins, stability of the papilla, and I'll do an immediate provisional. But what if I have a healed ridge in which my surgeon came in a second stage or my periodontist came in a second stage, placed an implant, and delivered a healing abutment?
The decision process to whether how I provisionalize this case is really going to vary on multiple things. One, how much do I have to modify the soft tissues? How far am I in this healed ridge to the final outcome? Am I going to have to shape this one millimeter apically or am I going to have to shape this four millimeters apically? That is going to dictate how I approach the case. If I'm going to go to a full contour provisional or if I'm going to go to a subcontour provisional, that's the first thing. Two, what are the dimensions of the soft tissue? Do I have a patient with a thick phenotype or do I have a patient with a very thin phenotype? If I have a patient with a thin phenotype, I have to go very slow, you know, carefully, right? A patient with a thicker phenotype, I have a little bit more leeway to push that tissue a little bit more and not cause an aesthetic problem, right?
Another thing to consider, of course, is to do this in the least amount of appointments possible, okay? And here I think it's very important to make it clear, not in the least amount of time possible, okay? In the least amount of appointments. I want to achieve the final result from that healed ridge to that beautiful looking outline, not in 20 appointments, not in 15 or 10 appointments, because every time we disconnect that implant, we're causing a biological disturbance to this weak mucosal seal. So, we really need to strategize this, okay? So, my selection or my workflow to provisionalize an implant is going to depend on these few factors. Position of the healed ridge in relationship to the ideal outline, the dimensions of the tissue, okay? And, of course, trying to achieve it in the least amount of appointments possible.
Today with the digital era, there's many ways to do it. Today in the digital world, well, you come in, what I do is I'll take the healing abutment off, put my scan body, design my crown in the CAD software. It allows me to see how much I'd have to push, like really measure, and allows me to make those judgment calls a little bit better than when I did it in the analog workflow where I was pretty much seeing it by eye, kind of adding little by little. Now, it's easier for me to just design crowns with different positions in that E-zone until I achieve what I want and do it in a computer setting. And if I want to print or mill three provisionals, one for each one of the stages, it takes me minutes, okay? And less guesswork, for sure.
Dr. Seibert: So, the implant has just been placed. Are you doing this alongside the surgeon?
Dr. Esquivel: It really depends, okay? I have great communication with my surgeons and my periodontists, and we understand it's a team approach. So, rarely does the patient go to surgery without me seeing him a couple of times and without me communicating with either the perio or the surgeon. Once I do, my goal is to put the teeth once again in the right position, make sure it's the right dimensional position, I composition do a mock-up.
I always say treating implants has six steps: A, B, C, D, E, and F. Acquisition of files, blueprint, confirmation, which would be your mock-up, design, execution, and follow-up. Every time I make my design or my blueprint, which would be my wax up, I try to do a mock-up if I can, make sure it looks good, make sure I'm in the right position. Once I've verified this in the patient's face, the patient's mouth, I'll send the STL file to my surgeon. My surgeon or my periodontist gets the STL file. They'll do their surgical planning. We get together, analyze the surgical planning with the restorative plan, and if it's not going to be an immediate implant with an immediate provisional, the surgeon does their surgery. I don't really need to be there, you know? If it's going to be an immediate implant with an immediate provisionalization, well, in this situation, yes, I have to be there in the surgical suite.
Dr. Seibert: Okay, let's assume that it is an immediate implant with immediate provisional. You have two options to go here. You can go the analog route or the digital route.
Dr. Esquivel: Analog route would be, I have a pre-milled shell, okay, maybe with two wings on neighboring teeth, and I'll do an analog pickup. Once the implant gets placed, good initial stability, I'll go ahead, pick up the provisional from the patient's mouth, and convert it. If it's the analog way. If it's the digital way, implant goes in, put scan body, scan, go to the mill or the printer, and I'll get the print, the design done and printed. In the meantime, in either or both processes, if I am in the surgery, then the periodontist at this moment can be doing a connective tissue graft, okay, and preparing everything else they have to prepare for me to be able to deliver that provisional restoration per se.
If it's not an immediate implant, if the implant's going to be delayed, well, the patient goes into the surgeon's office, the periodontist's office, gets the implants placed, and then I'll probably have prefabricated an Essix retainer for them. Patient gets the Essix, comes to see me when the implant is already integrated, and then I'll go through my provisionalization protocol. Same thing, analog workflow, pre-milled shell and pickup in the mouth. Digital workflow, patient comes in the morning to my office, I scan, then we go to the design and milling, and then I see another patient or other two patients while this is milling, and then just come in and insert it in the patient's mouth. Rarely do I only insert it, right? I always come back, insert, put in the patient's mouth, analyze where things are anatomically and aesthetically, modify the provisional if I have to, and then deliver.
Dr. Seibert: Can you talk to me a little bit about what you mean by being a pickup?
Dr. Esquivel: When I talk about pickup is imagine you have a shell, a tooth, a central incisor, and what we try to do is to make it have two wings, okay? One against the lateral, one against the other central incisor, and once the implant goes in, we'll put a temp cylinder to connect to an implant, and this shell already has a little access hole pre-milled into it, so I'll go in there and put it in the patient's mouth, and I'll inject any pickup medium, a flowable composite, whatever you decide, right? Once this implant provisional is trapped by this flowable composite to that temporary cylinder, I disconnect it from the implant, and I'm going to have the implant abutment, the temporary abutment attached to this shell.
Now, my task at this moment is, from this information of that metal shank, right, or the temp cylinder, and this attached piece of plastic, which is the tooth, is to rebuild or design chairside what the emergence profile should look like, okay? You can do it with PMMA, okay? Mix a little bit of powder liquid and build it up. Very important, put it in a pressure pot, okay? And then modify it with an acrylic burr, okay? You could do it with composite. Once again, with the composite too, you have to make sure that you have a good curing light, that you do the full process on it, okay? Because you don't want to have free radicals, or in case of powder and liquid, residual monomers. So you really need to make sure that everything is well taken care of. It's also clean before it goes back to the patient's mouth. Use a steamer, okay, to clean the provisionals before they go in the patient's mouth, and then ultimately deliver it to them, and just let the tissues heal around them.
Dr. Seibert: You made that sound so easy. Let's dive into the basic steps, my friend. So here's the scenario that I'm imagining. The implant has been placed at number eight, and the temporary cylinder chimney goes in. People opaque it with a flowable resin so it doesn't show through. You seat that temporary shell with an access hole and wings over it, and use composite to adhere that shell onto the temporary cylinder. Now the real magic becomes the emergence profile.
Dr. Esquivel: Science. Biological and aesthetic principles, right? Because when you see the emergence profile in your abutment, in your provisional, you need to understand what happens when you add and take away material, in this case, composite, from the different areas of that emergence profile. So let's go back to where you left it. You have that temporary cylinder with nothing between the zenith point of the shell and the lower platform of that cylinder inside the socket. The idea is that we're going to connect that zenith point to that lower portion of the abutment. And while we connect them together with composite, we're going to shape them adequately to optimize the biological response and optimize the aesthetic response.
One of the important things to understand is that anything that you add or take away in the area closer to the zenith point, which we term the E-zone or critical contour, is going to have a direct influence on the position of the free gingival margin. Let's say I add a little bit of composite just one millimeter apical to the zenith point. That is going to push my tissue apically. And if I take away right in the zenith point and make it sub-contoured with my burr, then that soft tissue is going to migrate coronally. We call it the E-zone because it's an aesthetically important area.
From that E-zone, that first millimeter, down to the connection of the implant, this is where the biologically important areas begin. You have the E-zone close to the zenith, and then you have the C-zone closer to the platform of the implant. In that C-zone, your abutment has to be very slim. Because you want to protect the tissues around the implant. Ideally, it stays in titanium because you picked the right height of your temporary cylinder shank. From that C-zone, which is around one and a half to two millimeters ideally, up to the E-zone, I'm going to have a space. This little space we call the B-zone or the biological boundary area. We got to make sure it's concave if possible. What you don't want to do in your provisional, especially if it's an immediate provisional, is create an over-contour that is going to compress the tissues and violate the principle of space. It leads to aesthetic and biological adversities.
So the E-zone gives you margin stability. The B-zone is where you develop biological areas—that's where your mucosal seal starts in the deeper portion of the supercrestal complex. And the C-zone is the most apical portion of your provisional restoration, which must be slim. If I over-contour the B and C zones, I get an inadequate biological response. And if I over-contour the E-zone, I'm going to have an inadequate aesthetic response.
Dr. Seibert: Tell me if you disagree, but to recapitulate, at that E-zone, the contours match the natural crown. At that B-zone, it becomes concave. At that C-zone, it's pretty straight and parallel. Can you review the exact height profiles of each zone?
Dr. Esquivel: This depends on the depth and the design of the implant. If you have a tissue level implant, that polished collar measures one to 1.5 millimeters, meaning the C-zone is already built into the implant design itself. You're only going to be working on the B-zone and E-zone. You have to understand the implant supercrestal complex: the deeper connective tissue, the junctional epithelium, and the sulcus. The E-zone is only going to live in the live sulcus area. On an equicrestal implant that sits four millimeters deep from the gingival margin, your E-zone is roughly going to measure one millimeter. The B-zone measures maybe one and a half millimeters. And your C-zone should measure one and a half to two millimeters ideally. If an implant is placed two millimeters subcrestal, your C-zone has to emerge perfectly straight until it hits a safety area before you can start doing your flare, otherwise you damage the bone.
Dr. Seibert: What is your practical technique for chairside creating this flare?
Dr. Esquivel: I like to use a pear-shaped acrylic bur. Once I establish my E and my C, I'll take that pear-shaped bur and lean it lightly, incline it, making sure not to touch my E-zone. Then I just create that concavity in the B area of the abutment. Most of my careful tracking adjustments happen on the E-zone because that's what my eye needs to be most critical about compared to the contralateral tooth. I'll draw with a pencil, take off from that E-zone until the gingival margins look really nice. The B-zone is just a concave connector. In a nutshell, the E-zone is an aesthetic function, the B-zone promotes that seal and tissue support, and the C-zone promotes crestal bone stability around the implant. Focus on understanding the basic biological and aesthetic fundamentals, because an implant is not a tooth. I'd rather have to change a plastic crown multiple times on an implant than have to replace one single failed implant fixture.
